Interested in making your own Rust server? Hosting a Rust server privately is an ideal way to create a closed community just for you and your friends to take on wild boars, bears, and even each other without unwanted interruption. This might seem intimidating at first, but if you’ve survived a night naked and alone on an island, setting up a Rust server should be no big deal.
Follow these steps and you’ll have your own dedicated Rust server up and running in no time.
Why set up your own Rust server?
There are plenty of official servers on Rust for you to join, but you won’t be able to choose who you play with and how your game is run. So, if you want full control over your gaming experience, you’ll need to create a gaming server of your own.
Over time, many community servers managed by players have cropped up on Rust. One of the main reasons players choose to host a Rust server themselves is that it allows them to install mods, customise maps, and control gameplay, along with choosing who to invite onto the server.
Another benefit of hosting a Rust server privately is the option to turn it into a paid community or donor-supported server. By offering unique features in your server, you’ll create an exclusive gaming community that players will pay to access.
Running a Rust server isn’t a one-off task. You’ll need to plan for updates, wipes, backups, and occasional performance tuning, particularly as your player base grows. Wipes reset the game world at set intervals, which helps keep gameplay balanced.
Rust server requirements (minimum specs)
To make sure your Rust server runs smoothly, you’ll need the right balance of RAM, CPU power, and network performance. Although 4GB of RAM is the minimum, starting with 8GB will give you more reliable performance, especially if you expect more players to join. For larger servers, 10GB is a safer option.
When it comes to processing power, a CPU running at around 3.4GHz is suitable for smaller servers, while higher player counts and larger maps benefit from clocks closer to 4.0GHz. And a good internet connection is a must.
Player numbers and mods have a direct impact on performance. Modded Rust servers, larger maps, and frequent wipes increase memory and CPU usage, which is why many admins start small and scale their Rust server hosting as the community grows.
Get the right specs, and you’ll host epic gaming sessions in no time. But which server is best for Rust?
These minimum specs can apply to both Windows and Linux servers. Many admins prefer Linux for long-term Rust server hosting, as it typically uses fewer resources and is well suited to always-on servers.
Which server model is best for Rust?
Now it’s time to choose the right Rust server hosting setup for your player count and mod requirements. If you’re not sure where to begin, don’t worry – we’ve done all the hard work for you by putting together a few recommended models.
VPS hosting works well for smaller Rust servers and testing environments. As player numbers rise or mod usage increases, a cloud or dedicated Rust server offers more consistent performance and fewer resource limits:
|
Players |
Minimum requirements |
Recommmended Virtual Private Server |
Recommended AMD Dedicated Server |
|---|---|---|---|
| 2-5 | Windows: 2.4Ghz 6GB RAM 40GB storage Linux: 3.4Ghz 5GB RAM 10GB storage |
Fasthosts VPS XL | Ryzen 5 Pro-HDD |
| 50+ | Windows: 4.0Ghz 10GB RAM 50GB storage Linux: 4.0Ghz 9GB RAM 20GB storage |
Fasthosts VPS XXL | Ryzen 5 Pro-HDD |
| 500+ | Windows: 4.6Ghz 16GB RAM 70GB storage Linux: 4.6Ghz 16GB RAM 40GB storage |
Fasthosts VPS XXL | Ryzen 5 Pro-HDD |
How to set up a Rust server (Windows VPS)
Как мы уже упоминали, настройка и управление сервером Rust на VPS проще, чем можно ожидать. Следуйте шагам ниже, чтобы создать свой собственный на Windows VPS. Эта установка использует SteamCMD для автоматической установки и обновления RustDedicated. Этот метод подходит, если вы хотите полный контроль над конфигурационными файлами, модами и обновлениями сервера, а не полагаетесь на управляемую панель.
- Перейдите в раздел «Этот компьютер» и нажмите на «Локальный диск (C:)».
- Создайте папку с именем «SteamCMD».
- Скачайте SteamCMD для Windows.
- Извлеките содержимое ZIP-архива в только что созданную папку «SteamCMD».
- Найдите «steamcmd» и запустите его. SteamCMD должен автоматически обновиться.
- Введите «force_install_dir c:rust_server» в командной строке для входа, затем «login anonymous» и «app_update 258550».
- После установки перейдите в папку «rust_server».
- Создайте новый файл с именем «start_server.bat» и скопируйте и вставьте следующее:
echo off
:start
C:SteamCMDsteamcmd.exe +login anonymous +force_install_dir c:rust_server +app_update 258550 +quit
RustDedicated.exe -batchmode +server.port 28015 +server.level "Procedural Map" +server.seed 1234 +server.worldsize 4000 +server.maxplayers 10 +server.hostname "Name of Server as Shown on the Client Server List" +server.description "Description shown on server connection window." +server.url "http://yourwebsite.com" +server.headerimage "http://yourwebsite.com/serverimage.jpg" +server.identity "server1" +rcon.port 28016 +rcon.password letmein +rcon.web 1
goto start
- Теперь настройте параметры по своему вкусу (например, размер мира, максимальное количество игроков и название сервера).
- Далее вам нужно убедиться, что порт 28015 TCP открыт во всех внешних файервэлах, подключенных к вашему серверу. Для выделенных серверов и VPS от Fasthosts это можно сделать, следуя нашему справочнику по политике файервэла.
Rust использует определенные сетевые порты для подключения игроков. Если эти порты заблокированы, сервер может работать, но не будет отображаться в публичном списке серверов.
- Нажмите клавишу Windows и найдите «Разрешить взаимодействие с приложением в брандмауэре Защитника Windows».
- Нажмите «Разрешить другое приложение…».
- Нажмите «Обзор», затем найдите файл в «C:/rust_server».
- Выберите «RustDedicated.exe» и нажмите «Открыть».
- Нажмите кнопку «Добавить», затем «ОК», чтобы убедиться, что сервер будет запускаться.
- Перейдите в «C:/rust_server» на вашем компьютере и нажмите «start_server.bat».
Отсюда вы можете установить популярные модовые фреймворки, такие как Oxide/uMod или Carbon, чтобы добавить плагины, инструменты для администрирования и пользовательские игровые функции.
Теперь вы готовы начать играть в Rust!
Нужна поддержка для вашего сервера Rust?
Всё ещё не уверены, как настроить сервер для Rust? Наши варианты хостинга для сервера Rust включают VPS и выделенные серверы с круглосуточной поддержкой, чтобы помочь вам запуститься и работать.
Комментарии
Категории
Случайное
Yoast SEO: полный разбор стоимости,
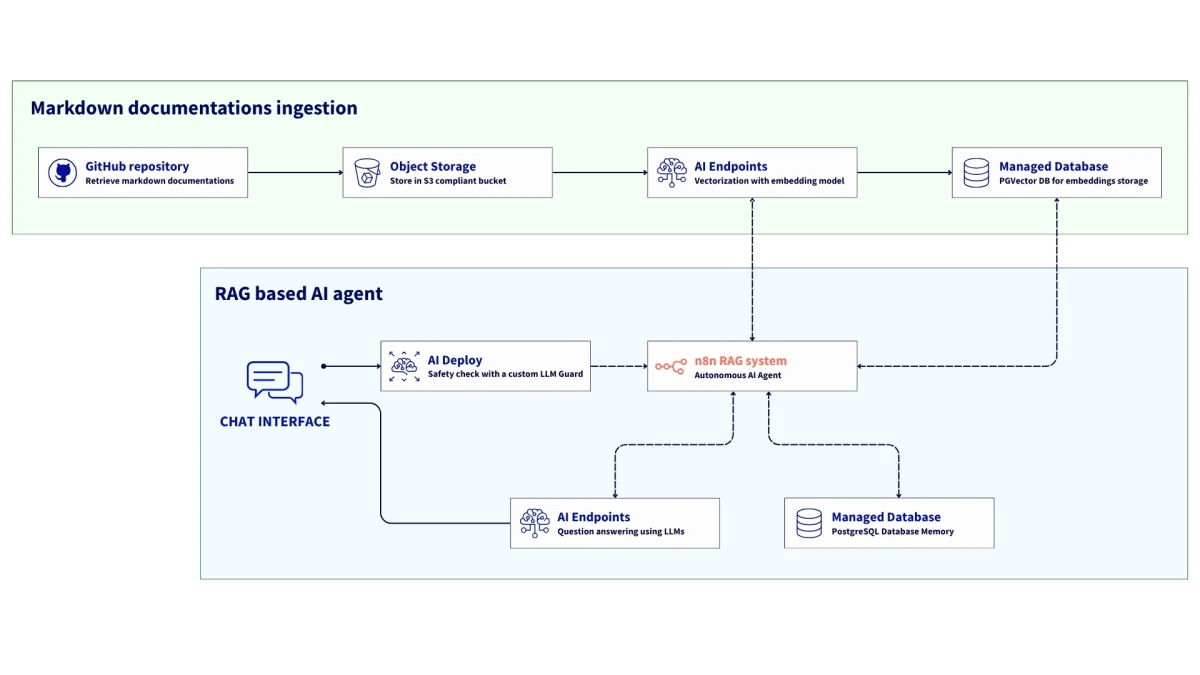
Как создать суверенного AI-агента с RAG

Кому действительно нужен AI-секретарь?
Перенос хостинга с GreenGeeks на